之前工作中做了一些关于slate方面的应用,需要抽时间来总结下。这里讲的是Slate中可以用来绘制的工具类FSlateDrawElement,它可以用来绘制诸如线段、矩形等图元,也可以用来绘制图片文字等。
然后这里有个
寻找FSlateDrawElement的动机和思路
项目工作中需要能够绘制线条等较为低级的API来完成,但是UMG层的Painting中只提供了较为简单的4种绘制方法:DrawBox、DrawLine、DrawLines、DrawText,无法处理一些复杂的图形,如各种多边形。因此亟需寻找功能更丰富的的API。最开始找的时候直接发现Viewport相关的FCanvas中有各种画线等功能的方法,属于#D类型的。但是这个对应的是蓝图中的DrawDebug系列的方法,并且项目功能主要是UI层面的,不想升维到3D空间增加问题复杂度,所以希望有一个2D UI层面的解决方案。然后观察到蓝图编辑界面的连线,标准的样条线模式,那么这个在UE4中是如何实现的呢?带着这个疑问,我尝试在VS中加断点,最终找到了接近我需要的这个类了(起初并不知道UMG层提供的DrawLine之类的函数,如果知道就会节约很多用于寻找时间)。
FSlateDrawElement简介
FSlateDrawElement位于Engine\Source\Runtime\SlateCore\Public\DrawElements.h文件中。位置表明分类,分类决定可用范围,该类属于SlateCore,也就是说可以用于Game中,也可以用在Editor Plugin中,更可以用于使用SlateCore的独立Programs中。所以还是很有用的类。
FSlateDrawElement支持的图元类型
1 | enum EElementType |
上面的代码摘自源码,基本上是它所支持的所有图元类型。对于2D层面的绘制来说Box、Line、Spline、Gradien、Text基本够用了,不过这里注意这里多了两个很强大的类型,Custom和CustomVerts,比如后者就可以用来绘制多边形(可填充)了。
创建FSlateDrawElment元素
这里以Line类型举例:1
2
3
4
5
6
7
8
9
10
11
12
13
14
15
16
17
18
19// Line path
TArray<FVector> LinePoints;
LinePoints.Add(FVector::ZeroVector());
LinePoints.Add(FVector(100.0f, 100.0f));
FLinearColor LineColor = FLinearColor::Red;
float LineThickness = 3.0f;
bool bUseAntialias = true;
FSlateDrawElement::MakeLines(
OutDrawElements,
LayerId,
AllottedGeometry.ToPaintGeometry(),
LinePoints,
ESlateDrawEffect::None,
LineColor,
bUseAntialias,
LineThickness
);
虽然上面只添加了两个点,但是实际上LinePoint可以理解成是一个Path,也就是说折线可以是用这种方式来表示,非填充的多边形也可以用这样的方式。在我的文末的贴的github上一个简单Demo中我就是基本只是用了这个类型实现了如下的一个钟的绘制: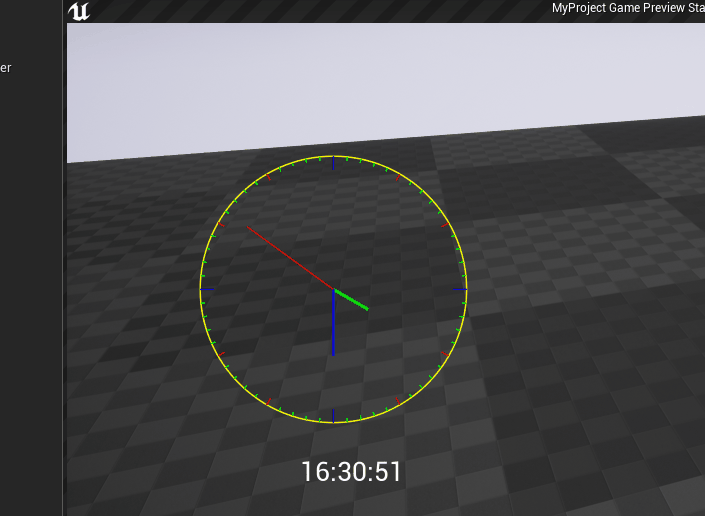
这里圆形的轮廓就是一系列的线段组成的,类似“割圆术”的操作,我割了360次就看起来比较圆了。另外这个方式有几个需要注意的地方:
- 若要来表示封闭的多边形你需要,Path的最后一个元素等于第一个元素就好了。
- 不连续的线需要另外创建Line元素,如图中刻度线就是单独的LineElement。
- 在4.17版本以前,可能是某个UE4程序员手误,把线宽代码生效的代码注释掉了并赋值为1.0f,你需要修改引擎源码才能看到线宽效果。并且线宽数值过大时,折线转折处会出线奇怪的表现。
使用FSlateDrawElment元素
使用FSlateDrawElement位置比较固定,上面的MakeLines是在SWidget::OnPaint中调用的,各个子类可以自己Override父类的该方法。该函数的函数签名及注释如下:1
2
3
4
5
6
7
8
9
10
11
12
13
14
15
16
17
18
19
20
21
22
23 /**
* Creates a line defined by the provided points
*
* @param ElementList The list in which to add elements
* @param InLayer The layer to draw the element on
* @param PaintGeometry DrawSpace position and dimensions; see FPaintGeometry
* @param Points Points that make up the lines. The points are joined together. I.E if Points has A,B,C there the line is A-B-C. To draw non-joining line segments call MakeLines multiple times
* @param InClippingRect Parts of the element are clipped if it falls outside of this rectangle
* @param InDrawEffects Optional draw effects to apply
* @param InTint Color to tint the element
* @param bAntialias Should antialiasing be applied to the line?
* @param Thickness The thickness of the line
*/
SLATECORE_API static void MakeLines(
FSlateWindowElementList& ElementList,
uint32 InLayer,
const FPaintGeometry& PaintGeometry,
const TArray<FVector2D>& Points,
ESlateDrawEffect InDrawEffects = ESlateDrawEffect::None,
const FLinearColor& InTint=FLinearColor::White,
bool bAntialias = true,
float Thickness = 1.0f
);
我们在调用Make系列的方法后就相当于设置了一个要绘制的元素。
更多的示例使用范例可以参看源码定义以及Engine\Source\Runtime\AppFramework\Public\Widgets\Testing\STestSuite.h中的示例代码。
FSlateDrawElment工作流程
上面说到调用Make系列的方法后会设置了一个要绘制的元素,注意这个时候并不是立马就绘制元素了。Slate需要做一系列的处理才会绘制我们要的元素,比如重排、剔除等。我们创建元素会被一个叫做ElementBatcher的类处理,它会根据我们的元素类型,去生成更细节的用以绘制的数据。然后再交给SlateRHIRender去绘制出来。这里只是简单的说了下流程,如果更细致请读者自行阅读代码,一般来说只是使用API的话可以不用过于深入。
FSlateDrawElment::CustomVerts的介绍
FSlateDrawElment::CustomVert是我项目功能中主要使用的方法,通过这个方法我们可以绘制纯色或自定义UV贴图的多边形。之所以能自定UV是因为这里是基于三角面片的数据定义方式,详细可以看如下从STestSuite中摘出来的代码片段:1
2
3
4
5
6
7
8
9
10
11
12
13
14
15
16
17
18
19
20
21
22
23
24
25
26
27
28
29
30
31
32
33
34
35
36
37
38
39
40
41
42
43
44
45
46
47
48
49
50
51
52
53
54
55
56
57
58
59
60
61
62
63
64int32 TestCustomVerts(const FOnPaintHandlerParams& InParams)
{
const float Radius = FMath::Min(InParams.Geometry.GetLocalSize().X, InParams.Geometry.GetLocalSize().Y) * 0.5f;
const FVector2D Center = InParams.Geometry.AbsolutePosition + InParams.Geometry.GetLocalSize() * 0.5f;
const FSlateBrush* MyBrush = FCoreStyle::Get().GetBrush("ColorWheel.HueValueCircle");
// @todo this is not the correct way to do this
FSlateShaderResourceProxy* ResourceProxy = FSlateDataPayload::ResourceManager->GetShaderResource(*MyBrush);
FSlateResourceHandle Handle = FSlateApplication::Get().GetRenderer()->GetResourceHandle( *MyBrush );
FVector2D UVCenter = FVector2D::ZeroVector;
FVector2D UVRadius = FVector2D(1,1);
if (ResourceProxy != nullptr)
{
UVRadius = 0.5f * ResourceProxy->SizeUV;
UVCenter = ResourceProxy->StartUV + UVRadius;
}
// Make a triangle fan in the area allotted
const int NumTris = 12;
TArray<FSlateVertex> Verts;
Verts.Reserve(NumTris*3);
// Center Vertex
Verts.AddZeroed();
{
FSlateVertex& NewVert = Verts.Last();
NewVert.Position[0] = Center.X;
NewVert.Position[1] = Center.Y;
NewVert.TexCoords[0] = UVCenter.X;
NewVert.TexCoords[1] = UVCenter.Y;
NewVert.TexCoords[2] = NewVert.TexCoords[3] = 1.0f;
NewVert.Color = FColor::White;
}
for (int i = 0; i < NumTris; ++i)
{
Verts.AddZeroed();
{
const float Angle = (2*PI*i) / NumTris;
const FVector2D EdgeDirection(FMath::Cos(Angle), FMath::Sin(Angle));
const FVector2D Edge(Radius*EdgeDirection);
FSlateVertex& NewVert = Verts.Last();
NewVert.Position[0] = Center.X + Edge.X;
NewVert.Position[1] = Center.Y + Edge.Y;
NewVert.TexCoords[0] = UVCenter.X + UVRadius.X*EdgeDirection.X;
NewVert.TexCoords[1] = UVCenter.Y + UVRadius.Y*EdgeDirection.Y;
NewVert.TexCoords[2] = NewVert.TexCoords[3] = 1.0f;
NewVert.Color = FColor::White;
}
}
TArray<SlateIndex> Indexes;
for (int i = 1; i <= NumTris; ++i)
{
Indexes.Add(0);
Indexes.Add(i);
Indexes.Add( (i+1 > 12) ? (1) : (i+1) );
}
FSlateDrawElement::MakeCustomVerts(InParams.OutDrawElements, InParams.Layer, Handle, Verts, Indexes, nullptr, 0, 0);
return InParams.Layer;
}
熟悉3D中图元的表示方法的话,理解这个方法应该很简单。
另外一个看起来类似的MakeCustom方法由于和渲染部分涉及太多,且源码中没有实例,故暂不管它。
小结
实际上FSlateDrawElement相对于各类2D绘制的API如GDI,html5的canvas来说,还是过于简单。不过好在有MakeCustomVerts的存在,我们可以定制相关的绘制方式。因此Slate总的来说还是很强大的。