项目中遇到了新需求,需要尝试把UI框架仿造成UE4 Editor那样,并想移植出Editor一部分功能到Game中来使用。首先先研究了下UE4启动部分并尝试先修改窗口样式。如下是最终效果图: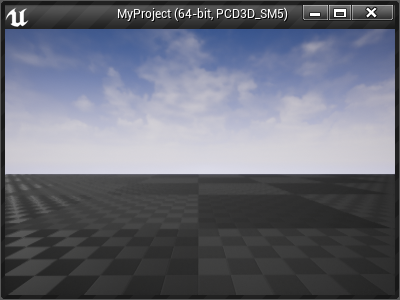
UE4在创建游戏窗口前这一段时间做了什么
《游戏引擎架构》中有提到,游戏引擎运行大致分为这么几个阶段:InitGame和GameLoop,UE4也不例外。在Window版本下,我们可以在源码中搜索CreateWindowEx函数设置断点,从Call Stack来确定窗口创建前UE4做了些什么。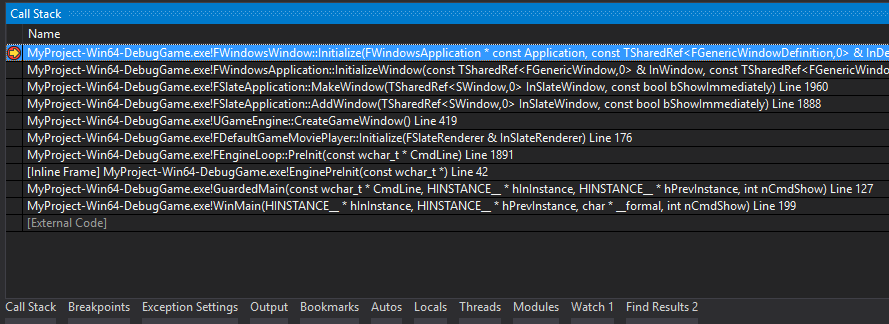
如上图可知,UE4引擎的统一的函数入口点为GuardedMain,位于Launch.cpp。这个文件中展示的结构和之前说的一致,只不过多了一个EnginePreInit阶段。而这些阶段在UE4中被抽象成了EngineLoop,非常清晰的叙述了各个阶段做了些什么。值得注意的是,在EnginePreInit阶段Editor和Game的分别使用了各自不同的Engine类型:1
2
3
4
5
6
7
8
9
10
11
12
13
14
15
16
17
18
19
20
21
22
23
24
25
26
27
28
29
30
31
32
33
34
35
36
37
38
39
40
41
42
43
44
45if ( GEngine == nullptr )
{
if ( GIsEditor )
{
FString EditorEngineClassName;
GConfig->GetString(TEXT("/Script/Engine.Engine"), TEXT("EditorEngine"), EditorEngineClassName, GEngineIni);
UClass* EditorEngineClass = StaticLoadClass( UEditorEngine::StaticClass(), nullptr, *EditorEngineClassName);
if (EditorEngineClass == nullptr)
{
UE_LOG(LogInit, Fatal, TEXT("Failed to load Editor Engine class '%s'."), *EditorEngineClassName);
}
GEngine = GEditor = NewObject<UEditorEngine>(GetTransientPackage(), EditorEngineClass);
GEngine->ParseCommandline();
UE_LOG(LogInit, Log, TEXT("Initializing Editor Engine..."));
GEditor->InitEditor(this);
UE_LOG(LogInit, Log, TEXT("Initializing Editor Engine Completed"));
}
else
#endif
{
FString GameEngineClassName;
GConfig->GetString(TEXT("/Script/Engine.Engine"), TEXT("GameEngine"), GameEngineClassName, GEngineIni);
UClass* EngineClass = StaticLoadClass( UEngine::StaticClass(), nullptr, *GameEngineClassName);
if (EngineClass == nullptr)
{
UE_LOG(LogInit, Fatal, TEXT("Failed to load Engine class '%s'."), *GameEngineClassName);
}
// must do this here so that the engine object that we create on the next line receives the correct property values
GEngine = NewObject<UEngine>(GetTransientPackage(), EngineClass);
check(GEngine);
GEngine->ParseCommandline();
UE_LOG(LogInit, Log, TEXT("Initializing Game Engine..."));
GEngine->Init(this);
UE_LOG(LogInit, Log, TEXT("Initializing Game Engine Completed"));
}
}
总的来说,在游戏窗口创建之前,通过PreInit做了命令行解析,加载相关模块等等。然后在GameEngine的Init中才开始创建我们所说的游戏窗口(这里说的游戏窗口实际上指的是带有GameViewport的窗口,单纯的窗口Splash界面和开场动画已经创建过了)。
修改窗口样式
通过上述的方式可以很快的找到我们的游戏窗口创建的代码。1
2
3
4
5
6
7
8
9
10
11
12
13
14
15
16
17
18
19
20
21
22
23
24
25
26
27
28
29
30
31
32
33
34
35
36
37
38
39
40
41
42
43
44
45
46
47
48
49
50
51
52
53
54
55
56
57
58
59
60
61
62
63
64
65
66
67
68
69
70
71
72
73
74
75
76
77
78
79
80
81
82
83
84
85
86
87
88
89
90
91
92
93
94
95
96
97
98
99
100
101
102
103
104
105
106
107
108
109
110
111
112
113
114
115
116
117
118
119
120
121
122
123
124
125
126
127
128
129
130
131
TSharedRef<SWindow> UGameEngine::CreateGameWindow()
{
int32 ResX = GSystemResolution.ResX;
int32 ResY = GSystemResolution.ResY;
EWindowMode::Type WindowMode = GSystemResolution.WindowMode;
ConditionallyOverrideSettings(ResX, ResY, WindowMode);
// If the current settings have been overridden, apply them back into the system
if (ResX != GSystemResolution.ResX || ResY != GSystemResolution.ResY || WindowMode != GSystemResolution.WindowMode)
{
FSystemResolution::RequestResolutionChange(ResX, ResY, WindowMode);
IConsoleManager::Get().CallAllConsoleVariableSinks();
}
const FText WindowTitleOverride = GetDefault<UGeneralProjectSettings>()->ProjectDisplayedTitle;
const FText WindowTitleComponent = WindowTitleOverride.IsEmpty() ? NSLOCTEXT("UnrealEd", "GameWindowTitle", "{GameName}") : WindowTitleOverride;
FText WindowDebugInfoComponent;
const FText WindowDebugInfoOverride = GetDefault<UGeneralProjectSettings>()->ProjectDebugTitleInfo;
WindowDebugInfoComponent = WindowDebugInfoOverride.IsEmpty() ? NSLOCTEXT("UnrealEd", "GameWindowTitleDebugInfo", "({PlatformArchitecture}-bit, {RHIName})") : WindowDebugInfoOverride;
//These are invariant strings so they don't need to be localized
const FText PlatformBits = FText::FromString( TEXT( "64" ) );
const FText PlatformBits = FText::FromString( TEXT( "32" ) );
// Note: If these parameters are updated or renamed, please update the tooltip on the ProjectDisplayedTitle and ProjectDebugTitleInfo properties
FFormatNamedArguments Args;
Args.Add( TEXT("GameName"), FText::FromString( FApp::GetGameName() ) );
Args.Add( TEXT("PlatformArchitecture"), PlatformBits );
Args.Add( TEXT("RHIName"), FText::FromName( LegacyShaderPlatformToShaderFormat( GMaxRHIShaderPlatform ) ) );
const FText WindowTitleVar = FText::Format(FText::FromString(TEXT("{0} {1}")), WindowTitleComponent, WindowDebugInfoComponent);
const FText WindowTitle = FText::Format(WindowTitleVar, Args);
const bool bShouldPreserveAspectRatio = GetDefault<UGeneralProjectSettings>()->bShouldWindowPreserveAspectRatio;
const bool bUseBorderlessWindow = GetDefault<UGeneralProjectSettings>()->bUseBorderlessWindow;
const bool bAllowWindowResize = GetDefault<UGeneralProjectSettings>()->bAllowWindowResize;
const bool bAllowClose = GetDefault<UGeneralProjectSettings>()->bAllowClose;
const bool bAllowMaximize = GetDefault<UGeneralProjectSettings>()->bAllowMaximize;
const bool bAllowMinimize = GetDefault<UGeneralProjectSettings>()->bAllowMinimize;
// Allow optional winX/winY parameters to set initial window position
EAutoCenter AutoCenterType = EAutoCenter::PrimaryWorkArea;
int32 WinX=0;
int32 WinY=0;
if (FParse::Value(FCommandLine::Get(), TEXT("WinX="), WinX) && FParse::Value(FCommandLine::Get(), TEXT("WinY="), WinY))
{
AutoCenterType = EAutoCenter::None;
}
// Give the window the max width/height of either the requested resolution, or your available desktop resolution
// We need to do this as we request some 4K windows when rendering sequences, and the OS may try and clamp that
// window to your available desktop resolution
TOptional<float> MaxWindowWidth;
TOptional<float> MaxWindowHeight;
if (WindowMode == EWindowMode::Windowed)
{
// Get available desktop area
FDisplayMetrics DisplayMetrics;
if (FSlateApplication::IsInitialized())
{
FSlateApplication::Get().GetInitialDisplayMetrics(DisplayMetrics);
}
else
{
FDisplayMetrics::GetDisplayMetrics(DisplayMetrics);
}
MaxWindowWidth = FMath::Max(DisplayMetrics.VirtualDisplayRect.Right - DisplayMetrics.VirtualDisplayRect.Left, ResX);
MaxWindowHeight = FMath::Max(DisplayMetrics.VirtualDisplayRect.Bottom - DisplayMetrics.VirtualDisplayRect.Top, ResY);
}
static FWindowStyle BorderlessStyle = FWindowStyle::GetDefault();
BorderlessStyle
.SetActiveTitleBrush(FSlateNoResource())
.SetInactiveTitleBrush(FSlateNoResource())
.SetFlashTitleBrush(FSlateNoResource())
.SetOutlineBrush(FSlateNoResource())
.SetBorderBrush(FSlateNoResource())
.SetBackgroundBrush(FSlateNoResource())
.SetChildBackgroundBrush(FSlateNoResource());
TSharedRef<SWindow> Window = SNew(SWindow)
.Type(EWindowType::GameWindow)
.Style(bUseBorderlessWindow ? &BorderlessStyle : &FCoreStyle::Get().GetWidgetStyle<FWindowStyle>("Window"))
.ClientSize(FVector2D(ResX, ResY))
.Title(WindowTitle)
.AutoCenter(AutoCenterType)
.ScreenPosition(FVector2D(WinX, WinY))
.MaxWidth(MaxWindowWidth)
.MaxHeight(MaxWindowHeight)
.FocusWhenFirstShown(true)
.SaneWindowPlacement(AutoCenterType == EAutoCenter::None)
//.UseOSWindowBorder(!bUseBorderlessWindow)
.CreateTitleBar(!bUseBorderlessWindow)
.ShouldPreserveAspectRatio(bShouldPreserveAspectRatio)
.LayoutBorder(bUseBorderlessWindow ? FMargin(0) : FMargin(5, 5, 5, 5))
.SizingRule(bAllowWindowResize ? ESizingRule::UserSized : ESizingRule::FixedSize)
.HasCloseButton(bAllowClose)
.SupportsMinimize(bAllowMinimize)
.SupportsMaximize(bAllowMaximize);
const bool bShowImmediately = false;
FSlateApplication::Get().AddWindow( Window, bShowImmediately );
// Do not set fullscreen mode here, since it doesn't take
// HMDDevice into account. The window mode will be set properly later
// from SwitchGameWindowToUseGameViewport() method (see ResizeWindow call).
if (WindowMode == EWindowMode::Fullscreen)
{
Window->SetWindowMode(EWindowMode::WindowedFullscreen);
}
else
{
Window->SetWindowMode(WindowMode);
}
Window->ShowWindow();
// Tick now to force a redraw of the window and ensure correct fullscreen application
FSlateApplication::Get().Tick();
return Window;
}
可以看出我们的游戏窗口本质上是一个Slate的SWindow,样式基本上都是由这里控制。如果要改变窗口样式的话,首先得是一个有边框的窗口,所以我们直接把.UseOSWindowBorder(!bUseBorderlessWindow)给注释掉便出现我们在开头图中展示的UE4默认窗口样式了。但是你以为这么就完了么?此时你会发现你的窗口内容是一片黑,并未出现游戏场景。如果使用RenderDod这样的工具可以看到,引擎会先绘制我们的游戏场景,然后再绘制Slate UI。它们会层叠在一起,因此看到一片漆黑。解决这个问题的关键在下面一段代码中的RenderDirectlyToWindow这个属性上,细讲下就是一个是Render To Texture之后然后作为Slate Brush绘制在Brush上,一个是直接输出到SwapChain中。
1 | TSharedRef<SViewport> GameViewportWidgetRef = |
就这样我们修改窗口样式的功能就完成了,实际操作的时候我们只需要把slate style中的资源替换成我们需要的资源就可以了。